When I first learned about Cascading Style Sheets (CSS), it was like opening a secret door. CSS lets us change how web pages look. It's a key part of making websites today.
At first, CSS was hard for me to understand. But with practice, I grew to love its beauty and flexibility. Now, I'm eager to teach you the basics of CSS.
In this article, we'll cover CSS basics. We'll talk about its role in web design and how to use selectors, properties, and values. This guide is for both new and experienced web developers. It will help you use CSS to make amazing websites.
Key Takeaways
- CSS is a crucial component of modern web design, allowing developers to control the visual appearance of web pages.
- Understanding the fundamentals of CSS, including the cascade, inheritance, and selectors, is essential for effective web development.
- Mastering CSS properties and values enables you to create custom styles and transform the look and feel of your web projects.
- Proper use of CSS can enhance the user experience, improve accessibility, and optimize website performance.
- Staying up-to-date with the latest CSS features and best practices is crucial for staying ahead in the ever-evolving web development landscape.
What is CSS?
CSS stands for Cascading Style Sheets.
It is the language that controls how web pages look. While HTML gives a page structure, CSS handles color, size, layout, and fonts. A web page needs HTML to hold content and CSS to present that content in a clear, attractive way.
In one sentence CSS tells the browser how to display HTML elements on the screen.
Why CSS matters?
- CSS separates content from design. This makes pages easier to build and maintain.
- CSS helps pages work on many screen sizes, from phone to desktop.
- CSS improves readability and user experience.
- Search engines and accessibility tools benefit from clean, well-structured CSS.
In short, CSS makes websites usable and pleasant.
How CSS works?
CSS uses rules. Each rule targets one or more HTML elements and sets style properties.
A CSS rule has three parts:
- Selector — which element(s) to style.
- Property — what to change (color, font-size).
- Value — the setting for that property.
Example:
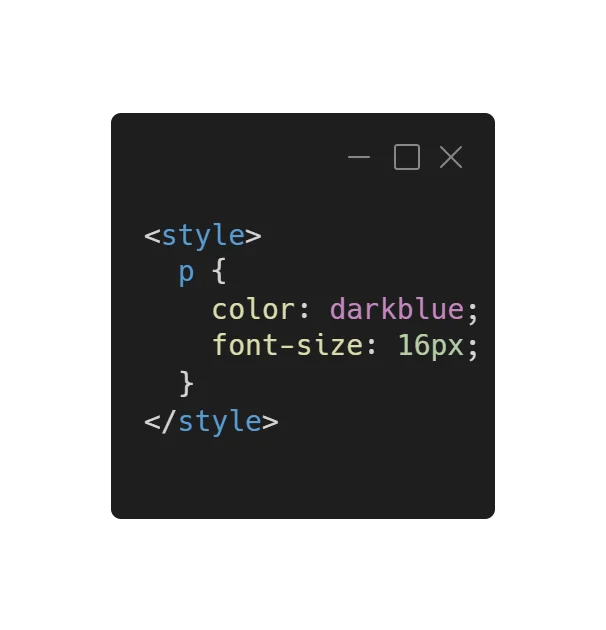
In this rule, the selector p targets all paragraph elements. The property color sets text color and font-size sets text size.
Understanding the Role of CSS
CSS is key in making web pages look good. It helps designers make websites look the same everywhere. This is done without changing the HTML code over and over.
Ways to add CSS to a page
1. Inline CSS
- Definition: Inline CSS applies styles directly to a specific HTML element using the
styleattribute. - Use Case: Used for quick, one-off styling for a particular element without affecting other elements.
- Disadvantage: Not recommended for larger projects as it mixes content (HTML) and presentation (CSS) in one place, making the code harder to maintain.
Example-
<p style="color: red; font-size: 20px;">This is styled with Inline CSS</p>2. Internal (Embedded) CSS
- Definition: Internal CSS is written within a
<style>tag inside the<head>section of an HTML document. It applies styles to the elements of the entire page. - Use Case: Useful when you want to apply styles to a single page and don’t need to reuse them on other pages.
- Disadvantage: Not efficient for large projects with multiple pages since the styles are only applied to a single HTML document.
Example-
<!DOCTYPE html>
<html lang="en">
<head>
  <meta charset="UTF-8">
  <meta name="viewport" content="width=device-width, initial-scale=1.0">
  <title>Internal CSS Example</title>
  <style>
    body {
      background-color: #f4f4f4;
    }
    p {
      color: blue;
      font-size: 18px;
    }
  </style>
</head>
<body>
  <p>This is styled with Internal CSS</p>
</body>
</html>
3. External CSS
- Definition: External CSS is written in a separate
.cssfile and linked to the HTML document using the<link>tag. - Use Case: Best for larger projects and when you want to apply consistent styles across multiple HTML documents. This method separates content (HTML) from presentation (CSS), making the code more maintainable.
- Disadvantage: Requires an extra HTTP request to load the CSS file, but this can be mitigated by caching.
Example-
<!DOCTYPE html>
<html lang="en">
<head>
  <meta charset="UTF-8">
  <meta name="viewport" content="width=device-width, initial-scale=1.0">
  <title>External CSS Example</title>
  <link rel="stylesheet" href="styles.css">
</head>
<body>
  <p>This is styled with External CSS</p>
</body>
</html>
body {
background-color: #fafafa;
}
p {
color: green;
font-size: 16px;
}Selectors — how you choose elements
Selectors tell CSS which elements to style. Here are common types:
Type selector: targets tags. Example:
h1 { }Class selector: targets elements with a class. Example:
.note { }ID selector: targets a unique element. Example:
#header { }Descendant selector: targets nested elements. Example:
nav a { }Attribute selector: targets elements by attributes. Example:
input[type="text"] { }
Use classes for repeated styles. Use IDs for unique items. Keep selectors short and meaningful.
Box model — how elements take up space
Every HTML element is a box. The box model defines how much space the element uses.
Parts of the box:
Content — text or images inside the box.
Padding — space inside the box around content.
Border — line around the padding.
Margin — space outside the border.
Example-
/* General container layout using Flexbox */
.container {
  display: flex;               /* Enables flexbox layout */
  justify-content: space-around; /* Space between the boxes */
  align-items: center;         /* Align items vertically center */
  padding: 20px;               /* Padding around the entire container */
  background-color: #f4f4f4;   /* Light grey background for the container */
  height: 100vh;               /* Full viewport height */
}

/* Box Model for each box */
.box {
  width: 200px;               /* Box width */
  padding: 20px;              /* Padding inside the box */
  margin: 10px;               /* Space between the boxes */
  border: 2px solid #333;     /* Border around the box */
  background-color: #fff;     /* White background */
  box-shadow: 2px 2px 8px rgba(0, 0, 0, 0.1); /* Adds a subtle shadow */
}

/* Text styling inside the box */
.box h2 {
  margin: 0 0 10px 0;         /* Adds margin only at the bottom */
  font-size: 1.5rem;          /* Larger heading font size */
  color: #2980b9;             /* Blue heading color */
}

.box p {
  font-size: 1rem;            /* Normal paragraph font size */
  color: #555;                /* Dark grey text color */
  line-height: 1.5;           /* Line height for readability */
}
Understanding the box model helps you control layout and spacing.
Layout basics — display and positioning
CSS controls layout with a few key properties:
Display — controls how an element behaves. Common values:
block— takes full width (e.g.,<div>).inline— flows inside a line (e.g.,<span>).inline-block— mixes block and inline behavior.none— hides the element.
Position — places elements:
static— default flow.relative— offset from normal position.absolute— positioned relative to nearest positioned ancestor.fixed— positioned relative to the viewport.
Modern layout tools:
Flexbox — good for one-dimensional layouts (rows or columns).
Grid — good for two-dimensional layouts (rows and columns).
Use flexbox for nav bars and simple rows. Use grid for complex page areas.
Responsive design — make pages fit any screen
Responsive design ensures a page looks good on phones, tablets, and desktops.
Media queries:
Apply styles only at certain screen widths.
Example-  Fluid units:
Use %, vw, and rem for sizes that scale.
Flexible layout:
Use flexbox and grid with rules that adapt.
Design for smallest screens first. Then add rules that enhance layouts on larger screens.
How CSS works with HTML and JavaScript
HTML provides structure and content.
CSS provides presentation and layout.
JavaScript adds behavior and interactivity.
They do different jobs. Use each for its purpose. For example, use CSS for hover effects and JavaScript for showing or hiding content when a user clicks a button.
Practical example — a simple card:
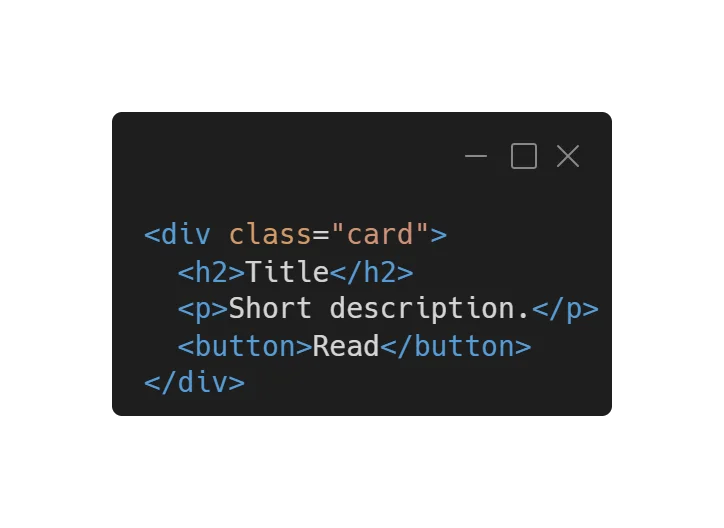
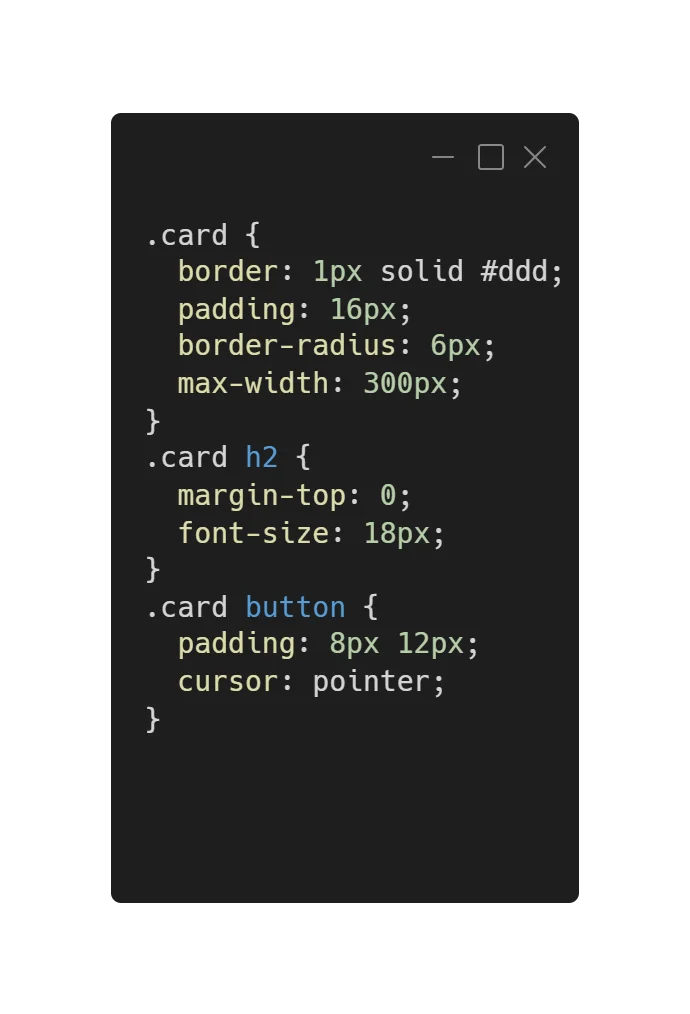 This code creates a neat card with a title, text, and button. Try it in a file named index.html and link a styles.css to see it work.
Advantages and Disadvantages of CSS
Advantages
Control over presentation.
Keep content separate from style.
Reuse styles across many pages.
Improve accessibility and readability.
Enable responsive layouts.
Disadvantages
Browser differences can cause layout issues.
Complex layouts can require deep learning.
Poor structure can harm accessibility.
Overly specific rules can lead to maintenance problems.
Best practices for beginners
Use external CSS files for projects.
Use classes for repeated styles.
Keep selectors short and clear.
Use semantic HTML with CSS for styling.
Test on multiple browsers and devices.
Learn flexbox and grid early.
Keep style rules organized and commented.
How long to learn CSS?
You can learn basic CSS in days. To become comfortable with layout, responsive design, and modern techniques like grid and flexbox, expect weeks of practice. Build small projects: a profile page, a blog layout, or a simple landing page.
Resources to learn more
Start with official documentation and tutorials from trusted sources:
The MDN Web Docs (Mozilla) has clear guides and references.
W3Schools offers simple examples for beginners.
FreeCodeCamp and codecademy provide hands-on lessons.
(These resources offer step-by-step lessons and examples that match what you learn here.)
FAQs About CSS
Q: What is CSS in simple words?
A: CSS stands for Cascading Style Sheets. It is the language used to control the appearance of a web page including colors, fonts, layout, and spacing. While HTML builds the structure, CSS makes it look good.
Q: Why is CSS important?
A: CSS is important because it separates content from design. This makes web pages easier to read, update, and maintain. It also ensures that websites look consistent across devices and screen sizes.
Q: Who created CSS?
A: CSS was first proposed by Håkon Wium Lie in 1994, while working with the World Wide Web Consortium (W3C). It has since evolved into one of the core technologies of the web, alongside HTML and JavaScript.
Q: How does CSS work with HTML?
A: CSS works by linking to HTML elements through selectors. For example, you can tell the browser to make all
(paragraph) text blue. The browser reads both HTML and CSS and then displays the styled content.
Q: Is CSS a programming language?
A: No, CSS is not a programming language. It is a style sheet language used to describe how elements should look on a web page. It doesn’t handle logic or data.
Q: What is the latest version of CSS?
A: The current standard is CSS3. It introduced many new features such as animations, transitions, shadows, gradients, and responsive layout systems like flexbox and grid.
Q: Can CSS work without HTML?
A: No, CSS cannot work alone. It needs HTML elements to style. HTML builds the structure; CSS enhances its presentation.
Q: Do all browsers support CSS?
A: Yes. All major browsers — Chrome, Edge, Firefox, Safari, and Opera — support CSS. However, some older browsers may not fully support newer CSS3 features.



Leave a Reply